Lightroom lets you specify a custom aspect ratio to use while cropping. Since our images are 1600 x 2166, I made the aspect ratio 21.66 x 16. You can then apply, or “sync”, this aspect ratio to all the images in a folder. This aspect ratio will be maintained while using the cropping tool. When it comes time to output (or “export” in Lightroom lingo), I use the option, “Resize to fit…long edge” with the value 2166. Then, viola, all the images are exported at 1600 x 2166. One caveat though—every once in a while, for reasons unbeknownst to me, the aspect ratio doesn’t carry over properly, and one or two images might come out at 1595 x 2166 or 1604 x 2166 or something like that. To catch those, I just display the folder in Windows Explorer with the files sorted by dimension. It’s really easy then to pick out the oddballs and reapply the correct aspect ratio just to those files. I’d say that happens to about 1-2% of my images. Also, that was in Lightroom 1.3 so the bug may be fixed in version 2.0
Saturday, August 30, 2008
Lightroom Tips.....

Thursday, August 28, 2008
A little help please.....
Monday, July 7, 2008
Pocket Wizard Alternative....
If anyone gets a set of these, please let me know.
Thursday, June 19, 2008
High School Night Football

Model: Canon EOS-1D Mark II
Lens (mm): 300
ISO: 800
Aperture: 3.5
Shutter: 1/250
Exp. Comp.: 0.0
Flash Comp.:
Program: Manual (of course!)
click on photo to see larger image
no noise reduction software was used in this image.
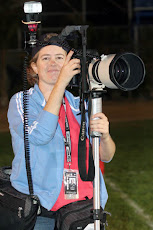
I shot this with a Canon 580ex speedlite set on E-TTL using the bracket shown in my blog photo, in fact my husband took that photo of me at this game. I plan on going to the "down on monopod" bracket for this season.
editors note: If anyone has any comments or thinks I left something out, please send me an email. I welcome any tips you have that others might find useful.
Thanks!
Since most high school games are played at night and most high school fields are badly lit with nasty colored mercury vapor lights that pulse different colors every half second, on camera flash is a required tool to make images that are sharp, well exposed (i.e. no noise) and have good color. We’ve been using flash for night football for several years; we pretty much have down to a science.
Flash: understanding how the flash works helps. Flash is your friend, it’s a powerful tool that is sadly under utilized by most digital photographers. When you shoot in low light you’re forced to shoot with a slower shutter speed to gather sufficient light to create the image. This is fine if the camera is on a tripod and the subject is standing still. But for sports a slow shutter speed will create a blurry image as the subject moves through the frame. Flash will freeze the subject and create a sharp image even with a slow shutter speed. The flash duration (the time the flash throws out light) essentially becomes your shutter speed, anywhere from 1/1000th to 1/20,000th. Use a flash made for your camera (have a Canon, use a Canon speedlite, Nikon? use a Nikon speedlight) and I find that setting the flash in e-ttl or i-ttl mode works the best for me, using manual flash settings is difficult when players are moving all over the field, too hard to adjust on the fly when the play suddenly ends up happening 5 feet in front of you when you had the flash set to work at 10 ft or you’re running down the field to get ahead of the play. Others maintain that manual mode (1/4 power - 1/2 ) gives them a more consistent light. The lower the power on the flash the faster the duration. But it may not get you enough light further away or too much closer in. Best thing to do is experiment and find the best recipe for you. Remember these are just suggestions and guidelines to get you started, you should know your gear and learn techniques that make sense for you. Photography is a craft, an art, nothing is set in stone.
Ambient vs. Flash: Ambient or available light is the existing light surrounding the subject. If you try to use the flash just as fill instead of the main source of light, ghosting or motion blur will occur because the ambient light is affecting the exposure. You need to overcome the ambient light with the flash by at least 2-3 stops. If you’re using e-ttl/i-ttl this shouldn’t be a problem, the flash will automatically send out enough light to overcome ambient and correctly expose the subject without making it look over flashed or light blasted. To fine tune the light you can adjust the FEV (flash exposure compensation) on camera or on the flash or adjust your ISO. Not sure why but most folks agree that FEV works best if adjusted on the camera. If you’re using manual power you need to really watch your histograms. You may have some clipping on the left (shadows) but watch for clipping on the right, highlights. I look for a peak someplace in the midtones with a nice slope into the shadows and highlights. Looking at histograms and deciphering them takes a bit of practice. To test whether you are going to be over ambient with your flash, just set your camera at 800 ISO, f4 @ 1250th and take a photo, it should be very dark, adjust accordingly.
Settings: Every camera has a flash sync speed, most sync at 1/250th; check your camera manual if you’re unsure of your camera’s sync speed. If the shutter speed is set higher than the flash sync speed, you risk seeing the shutter in part of your image, set it too slow and you may get too much available light affecting the exposure and creating blur/ghosting or a color shift
ISO depends on the field, a very dark field with low ambient light might require a higher ISO setting of 800 ISO, a very bright field with good lights might need a lower ISO to prevent motion blur and overcome ambient light, something in the range of ISO 640. Using a very high ISO (over 1000) with flash will be counter productive, you’ll let in too much ambient light, images won’t be sharp, color will be affected by the field lights and you’ll get noise in your images. For some reason we've been seeing many shooters using ISO 3200 and flash, please don't do this, the images tend to be very noisy, blurry and thin. It makes no sense to use a flash and a very high ISO.
Since the background will be fairly dark, depth of field is not as critical, so most of us shoot at around f4, seems to balance the light better at a slightly closed down shutter speed, less chance of blowing the highlights (those shiny white polyester uniforms and white plastic helmets) but you should use the fastest lens you own, a slower lens will be harder to focus in low light. A fast lens (max. aperture of f2.8 or larger) will focus wide open and only close down to your chosen f-stop when the shutter is pushed. Bigger lens opening, more light is gathered and focus is faster. Bigger straw = faster focus Smaller straw = slower focus, AF will be hard to grab in low light, even with a fast lens, it will sometimes hunt for focus, so it helps to focus on a lighter color, white uniforms or the white number on a dark uniform.
Red Eye/Zombie Eye: Red eye can be easily fixed, zombie eye cannot. It’s best to avoid both. The way to do that is to get the flash off the camera and away from the lens. Most of us use a bracket to get the flash up higher or off to the side or both. Some shooters have found that putting the flash down low and attaching it to the monopod works best for them. But basically you just need to get the flash off-axis from the lens. An off camera cord keeps the flash connected to the camera and allows the use of e-ttl/i-ttl.
Here's a great thread on SportsShooter on how some photographers rig their flashes for night football to get the least amount of zombie eye or red eye.
http://www.sportsshooter.com/message_display.html?tid=30821
Fixing Red Eye: Here’s a simple fix for slight red eye.* Use the brush tool in saturation mode to remove the red color. Make the tool the same size as the red part of the eye and set the opacity at around 50%, it’s best to start slow and gradually take out the color. Then use the burn tool in midtones also at around 50% or less and get back some of the detail in the pupil area. Zoom into the eyes when you do this, I’ve actually seen images where the subject had grey raccoon markings where the color had been removed from not only the eye but the face surrounding the eyes, very sloppy. Okay, now let’s talk about ethics and red eye removal, our stand is that the red eye is not there naturally but is created by the photographer, so it’s not unethical to remove it from the image.
*(thanks to Todd and Dirk Dewachter for the tips on red eye removal)
Fixing Ghost Eye/Zombie Eye: Most of the time ghost eye or zombie eye can't be fixed. But if you have just slight zombie eye and there is some detail left in there then it might be saved. Check this out for my method.....http://mpphotoeditor.blogspot.com/2008/11/ghost-eye-fix.html Best thing to do though is to avoid it at all costs, everyone needs eyes or they look totally creepy! Eyes are wet and glisten, so coloring them in makes it look even creepier, seriously bad. Like dead eyes, who wants a photo of someone with dead eyes???? UGH!
Wednesday, May 28, 2008
Championship Jube....

The most important shot from a championship game is the jube or celebration. All the emotion and excitement of winning captured in one image. Be ready towards the end of the game, don't be caught flat footed because you weren't paying attention. Anticipate, get in position and keep your eye in the viewfinder, shoot through the celebration, chimp later. Also don't be the one who runs out and ruins the shot for everyone else, we hate that guy. :) For night games and indoor stuff, don't be lazy, throw a flash on there and get some quality images, put some light on those faces. Flash is also key for the group shot with trophy, even during the day, a little fill flash will really make the image pop and get rid of all that raccoon eye and cap shadows.
Wednesday, May 21, 2008
Always something interesting....

Heston Quan is always thinking outside the box, I know when I open one of his galleries he'll have some really cool shot in there, but I was really blown away by his recent Track and Field gallery.
Nice stuff Heston!
Here's the link to Heston's Gallery:
CIF- SS Championships (Boys Long Jump)
Photo by Heston Quan
Tuesday, May 13, 2008
Back Button Focus
But it works for you Nikon shooters too. :)